07 Aug 2017
Recently I was working on a project with Arduino Nano. To fit the entire project into a 3D printed closure with limited space, I was searching for ways to shrink down the physical footprint of the Arduino Nano board. That’s when I came across this video, in which it mentioned the ATtiny85 chip. It is a variant of a family of Arduino compatible 8-bit controllers with only 8 pins. The small form factor fits the bill perfectly, plus I can use the same code for Nano as long as it can fit into chip’s 8KB memory.
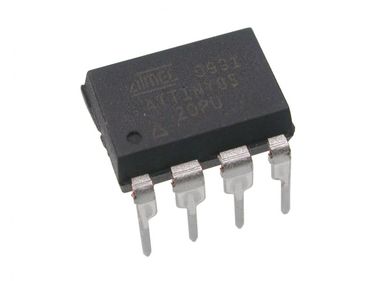
After some digging, it turns out the video was based on two blog posts from MIT Media Lab’s High-Low Tech group: Programming an ATtiny w/ Arduino 1.6 (or 1.0) and Arduino board as ATtiny programmer. The idea behind the posts is really simple: use Arduino Uno as an in-system programmer (ISP) to upload Arduino code to ATtiny85. Albeit I only have an Arduino Nano, the instructions are quite straightforward to follow. However, judging from the software versions, the posts were there for a while, and I did run into some troubles. So I decide to summarize the procedures I took to make it work.
# Load Arduino Nano with ISP Program
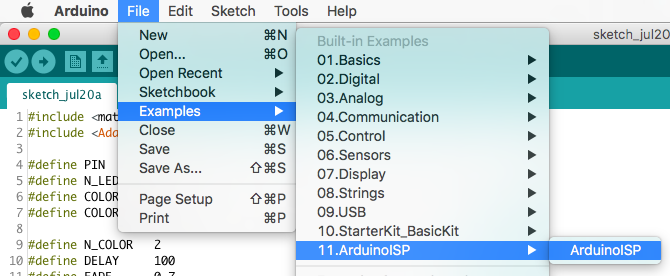
Step 1: open Arduino IDE (for this, I am using the newest version of 1.8.3), and open the ArduinoISP sketch in Examples.
Step 2: make sure the programmer is set to AVRISP mkII, because we need to upload the sketch to Nano first.
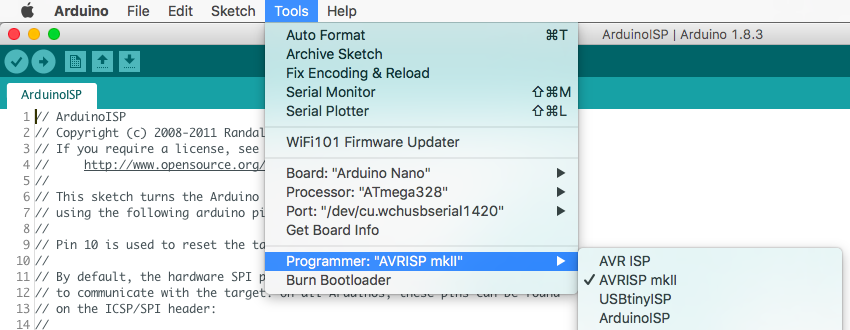
Step 3: upload it and… Done! (Well, for now…)
# Wire Up
Follow this wiring diagram to connect ATtiny85 with Arduino Nano.
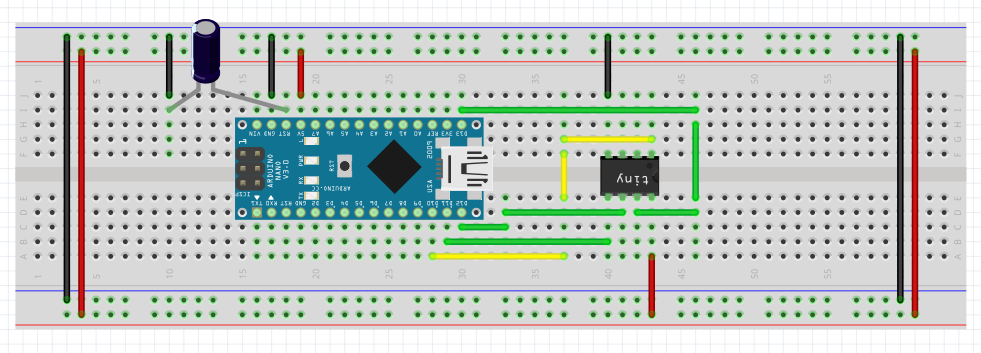
Here are some tips:
- You need a 10uF capacitor between Nano’s reset (RST) and ground (GND) to prevent Nano from resetting during upload
- Nano pin 13 -> ATtiny85 pin 2
- Nano pin 12 -> ATtiny85 pin 1
- Nano pin 11 -> ATtiny85 pin 0
- Nano pin 10 -> ATtiny85 Reset
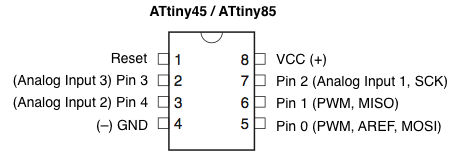
Nano’s pins are clearly labeled on the board. In case you are wondering about the pin on ATtiny85, here is the pin layout diagram.
# Install ATtiny Boards
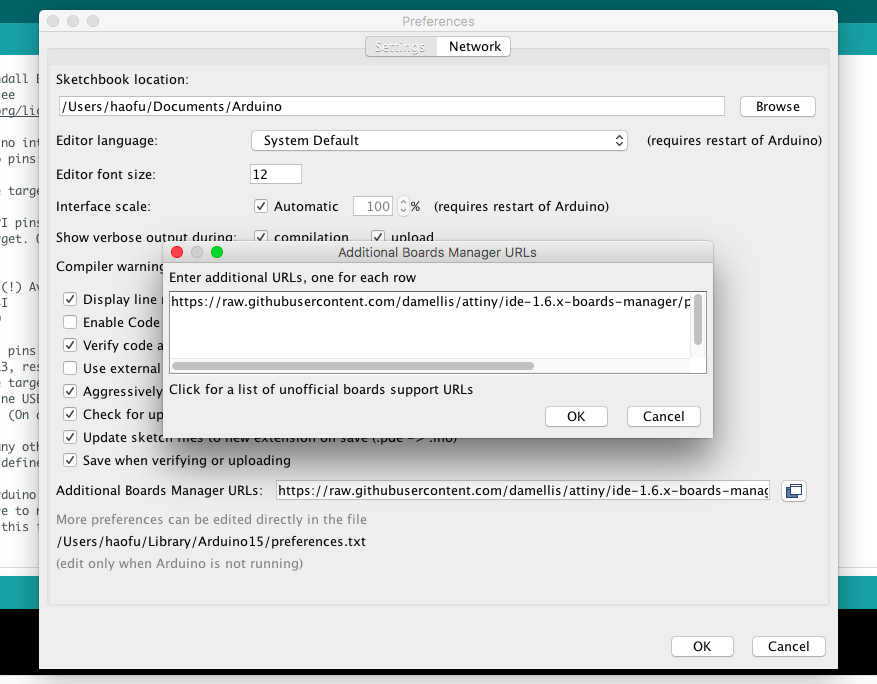
Step 1: open Preferences in Arduino IDE, and add https://raw.githubusercontent.com/damellis/attiny/ide-1.6.x-boards-manager/package_damellis_attiny_index.json to Additional Boards Manager URLs.
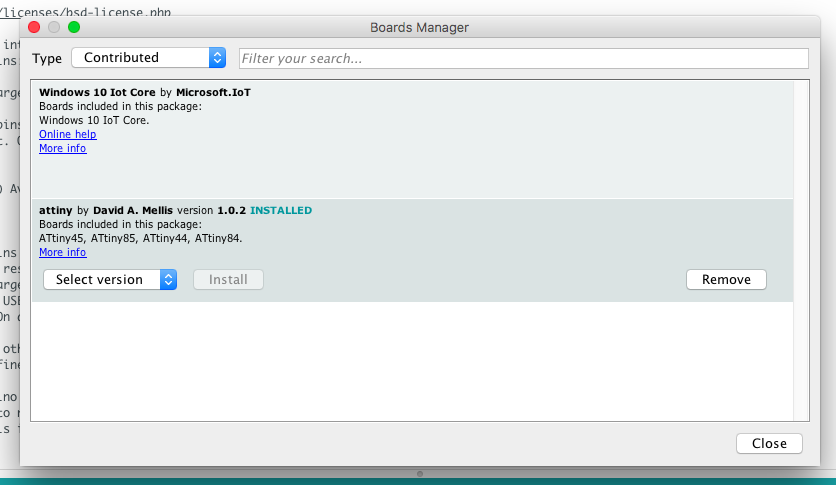
Step 2: open Board Manager and install attiny boards.

# Upload Code
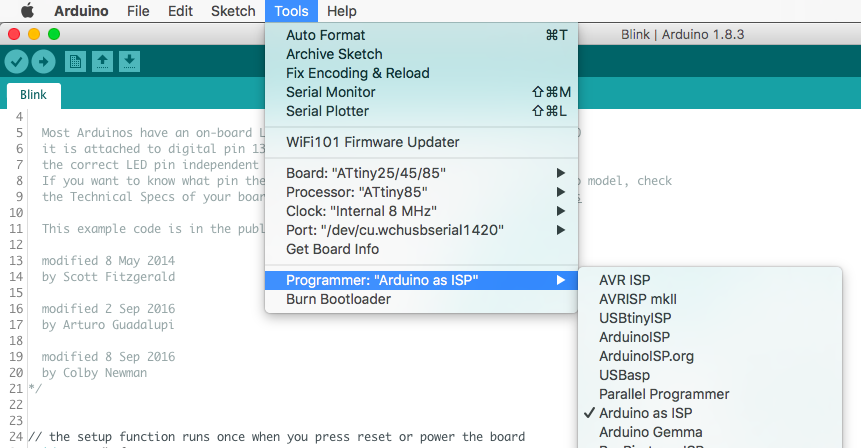
Right before uploading the code, we need to burn the bootloader to the brand new ATtiny85 chip with the following settings. Once bootloader is ready, upload the code, and make sure to select programmer as Arduino as ISP.
18 Apr 2017
I am working on a simple multi-player browser game. I used node.js as game server, and socket.io to establish real-time messaging between the players. Naturally, there is a room management module keeping track of all active game sessions, and synchronizing states among all involved parties. As part of the module, I keep game state and player states in the room data structure, which I constantly update when the game or player is emitting an event. With that, I found myself writing endless adapter codes to parse events and updating states, which made me wonder if there is an easier way to do this…
Of course there is. One of the solution is jQuery’s extend() function. As the documentation states:
jQuery.extend( target [, object1 ] [, objectN ] )
Description: Merge the contents of two or more objects together into the first object.
which, will do the trick just fine. However, I want to add some other features into it in case I need them, such as calculate the delta (difference) of the merge. After some digging around StackOverflow, it seems going through all the properties of the object and update each individually is a popular solution. So I took the idea a step further to incorporate the updating of nested objects, and here is fuse.js:
(function () {

    /**
     * Wrapper function
     * @param target: target object
     * @param delta: delta object
     * @return
     */
    module.exports = function (target, delta) {
        return f(target, delta);
    };

    /**
     * Recursive call function
     * @param target: target object
     * @param delta: delta object
     * @return
     */
    function f (target, delta) {
        // Base case:
        // if obj is not object/array, just return itself
        if (typeof delta !== 'object') {
            return delta;
        }
        // General case:
        // go through all key/index(s) in object/array
        for (var key in delta) {
            if (target.hasOwnProperty(key)) {
                // update
                target[key] = f(target[key], delta[key]);
            } else {
                // insert
                target[key] = delta[key];
            }
        }
        return target;
    }

})();
It’s an extremely simple snippet which is quite self-explanatory. However, there is one thing requires clarification: in this script, an array is treated the same as an object, so if you are updating say [1,2,3,4] with [7,8], the end result will be [7,8,3,4], because these elements share the same index, which effectively is key in the snippet.
Future work: I will keep adding features to this module as I mentioned before, hopefully it will be somewhat useful in the future.
23 Mar 2017
If you want to make a dialogue based game, the first task to tackle is making a decent looking speech bubble. (If you just want to check out the Unity code, fast forward FancySpeechBubble on GitHub)
Recently, our artist asked me to implement a speech bubble for a game we are developing similar in style as the speech bubble you see in the game Night in the Woods. There are two main features for this particular style: characters appear one by one, and a character shows up with a scale-up animation.
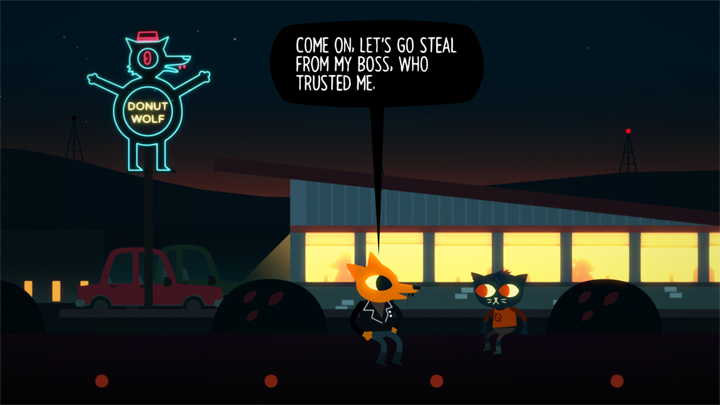
(Source: https://static2.gamespot.com/uploads/original/1197/11970954/2563818-screenshot2.png)
In the context of Unity, my first thought is using Unity’s own UI Text element, which comes in handy with rich text support. The fact that Night in the Woods (NITW) is developed with Unity makes me wonder: How Hard Can It Be?

As it turned out, pretty…
Before I go into details, I need to explain that I used a ContentSizeFitter with Vertical Fit set to Preferred on a UI Text with fixed Font Size. The reason for that is I found the Best Fit feature of the UI Text not reliable and the attached TextGenerate not spitting out any useful information about the rendered text.
The set up made sense to me and I went on and write a coroutine to add characters one by one to the UI Text element. However, that’s when I encountered my first and biggest problem.
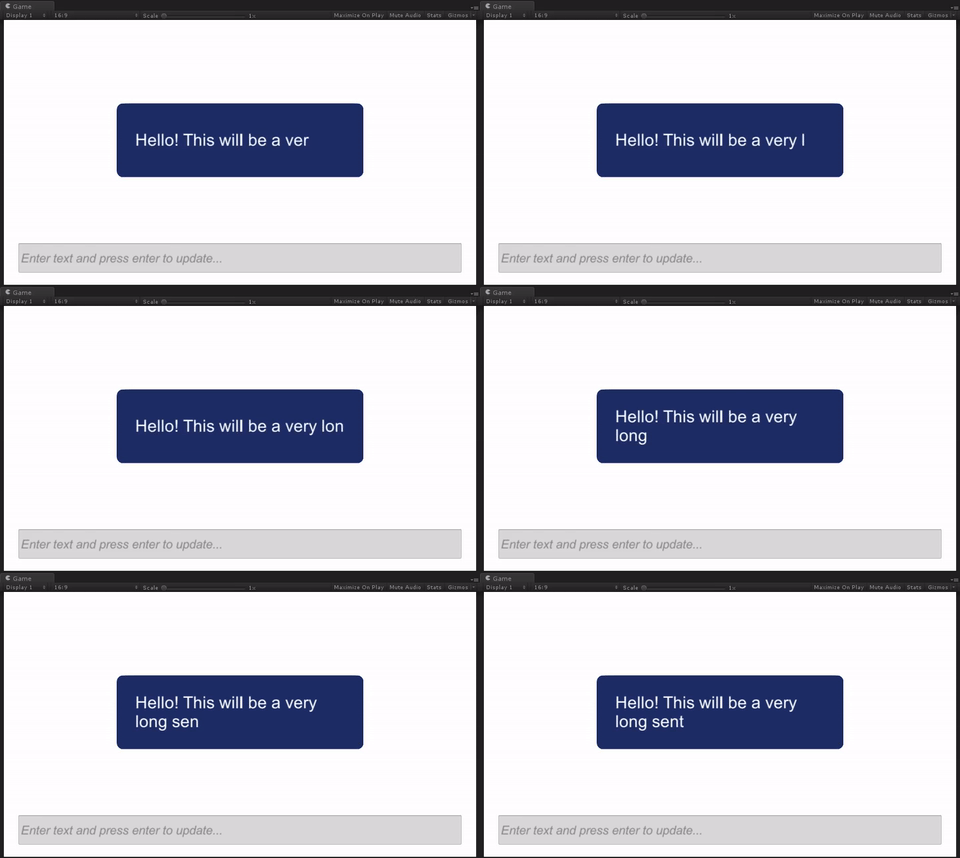
If you look closely at the word “long” in the above GIF, you will find that the word stayed on the first line when only “lo” showed up, and was bumped to the second line when more characters appeared. This is not how the speech bubble in NITW looks, and it will make character scale-up animation messy.
If you used NGUI in Unity before, you will know that NGUI’s Label class has an attribute called processedText. Once you set the Label’s text, it will store a processed version of the raw text with newline character (‘\n’) inserted where text is broken into lines, which could solve the problem.
Unfortunately, there isn’t a counterpart in Unity’s UI Text, so I have to make one myself.
_processedText = "";
string buffer = "";
string line = "";
float currentHeight = -1f;
// yes, sorry multiple spaces
foreach (string word in _rawText.Split(' ')) {
	buffer += word + " ";
	label.text = buffer;
	yield return new WaitForEndOfFrame();
	if (currentHeight < 0f) {
		currentHeight = label.rectTransform.sizeDelta.y;
	}
	if (currentHeight != label.rectTransform.sizeDelta.y) {
		currentHeight = label.rectTransform.sizeDelta.y;
		_processedText += line.TrimEnd(' ') + "\n";
		line = "";
	}
	line += word + " ";
}
_processedText += line;
The idea is pretty simple. I basically break down the text into words by using a space delimiter (yes, I know this will ignore multiple spaces cases, but it’s not important), and add them back to UI Text one by one while constantly checking if the height of the UI Text is changed. A changed height simply means current word belongs to the next line, so I add a ‘\n’ before the word. There is a catch though, before I can check the height of UI Text, I do have to wait for a frame for the it to properly update the value, which is why this snippet of code has to run within a coroutine.
Now that I have a working copy of processedText, I moved on to implement the main features of the speech bubble, namely the character shows up and scale-up animation. Thankfully, UI Text does have the rich text support, which means I can use <size=20>c</size> to set one character’s font size.
private IEnumerator CharacterAnimation ()
{
	// prepare target
	Text label = GetComponent<Text>();

	// go through character in processed text
	string prefix = "";
	foreach (char c in _processedText.ToCharArray()) {
		// animate character size
		int size = characterStartSize;
		while (size < label.fontSize) {
			size += (int)(Time.deltaTime * characterAnimateSpeed);
			size = Mathf.Min(size, label.fontSize);
			label.text = prefix + "<size=" + size + ">" + c + "</size>";
			yield return new WaitForEndOfFrame();
		}
		prefix += c;
	}

	// set processed text
	label.text = _processedText;
}
All is well right? Not yet. There is one final things. Remember I have a ContentSizeFitter on the UI Text to handle the height fitting. When the above coroutine is running, the height will be always changing. As a result, an already printed line will be bumped up when the next line appears. My solution is enable content fitting when I test fit the words and disable it during character animation. Combined with previously mentioned processedText generation and some other minor stuff. Here is the complete coroutine that does the test fitting.
private IEnumerator TestFit ()
{
	// prepare targets
	Text label = GetComponent<Text>();
	ContentSizeFitter fitter = GetComponent<ContentSizeFitter>();

	// change label alpha to zero to hide test fit
	float alpha = label.color.a;
	label.color = new Color(label.color.r, label.color.g, label.color.b, 0f);

	// configure fitter and set label text so label can auto resize height
	fitter.horizontalFit = ContentSizeFitter.FitMode.Unconstrained;
	fitter.verticalFit = ContentSizeFitter.FitMode.PreferredSize;
	label.text = _rawText;

	// need to wait for a frame before label's height is updated
	yield return new WaitForEndOfFrame();
	// make sure label is anchored to center to measure the correct height
	float totalHeight = label.rectTransform.sizeDelta.y;

	// (OPTIONAL) set bubble background
	if (bubbleBackground != null) {
		bubbleBackground.rectTransform.sizeDelta = new Vector2(
			bubbleBackground.rectTransform.sizeDelta.x,
			Mathf.Max(totalHeight + backgroundVerticalMargin, backgroundMinimumHeight));
	}

	// now it's time to test word by word
	_processedText = "";
	string buffer = "";
	string line = "";
	float currentHeight = -1f;
	// yes, sorry multiple spaces
	foreach (string word in _rawText.Split(' ')) {
		buffer += word + " ";
		label.text = buffer;
		yield return new WaitForEndOfFrame();
		if (currentHeight < 0f) {
			currentHeight = label.rectTransform.sizeDelta.y;
		}
		if (currentHeight != label.rectTransform.sizeDelta.y) {
			currentHeight = label.rectTransform.sizeDelta.y;
			_processedText += line.TrimEnd(' ') + "\n";
			line = "";
		}
		line += word + " ";
	}
	_processedText += line;

	// prepare fitter and label for character animation
	fitter.horizontalFit = ContentSizeFitter.FitMode.Unconstrained;
	fitter.verticalFit = ContentSizeFitter.FitMode.Unconstrained;
	label.text = "";
	label.rectTransform.sizeDelta = new Vector2(label.rectTransform.sizeDelta.x, totalHeight);
	label.color = new Color(label.color.r, label.color.g, label.color.b, alpha);
}
And this is the final result.
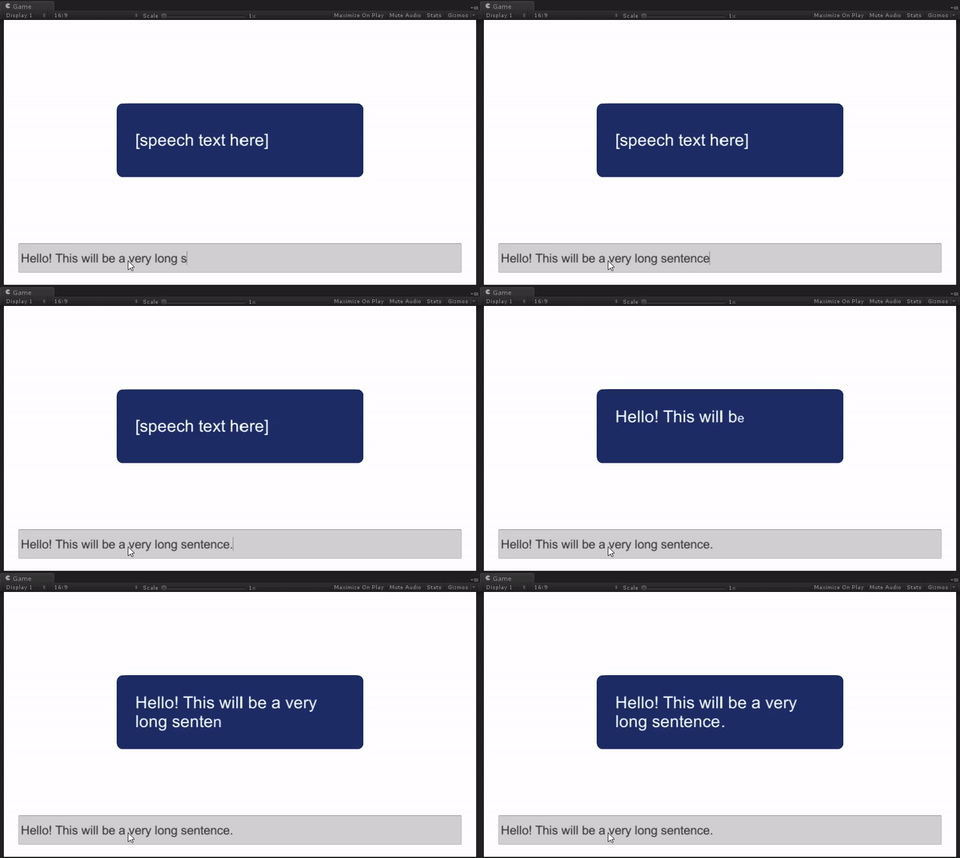
PS: you can get the code and example scene at FancySpeechBubble repository on GitHub.
30 Aug 2016
So what does Buy One Get One Half Off really mean? This actually can be shown in very simple math. If you are not interested in the math, here is the short version: IT MEANS AT LEAST 25% IN PROFIT.
Before we start, let me put down a few logical assumptions:
- The selling price of any item constitutes of cost and profit,
- Seller is selling any item with positive cost and for profit, so and
- Seller is selling all items at the same profit margin (ratio of profit and cost) , item , , and
- If a buyer buys two items with different prices, the buyer pays for the full price of the higher priced item
- With buy one get one half off, seller is still making money
With these assumptions, we can begin:
Let’s take two items: item and item , without loss of generality, let’s assume item is at least as expensive as item , .
The price we are paying for these two items is , which is .
In order for the seller to make money, this amount should at least cover the cost of the two items, .
So we have an inequality, , which is .
By eliminating and rearranging terms, we have .
Remember that we made an assumption earlier that item , , so we can substitute with , and have
Rearranging the terms once more, we have .
Because we assumed , we have , so , and the right hand side of the above inequality follows .
As you can see that the maximum is achieved when , which is , which basically means we bought two identical items.
To make money in any given scenario, the seller should set the profit margin to cover the worst case. So we reached the final conclusion:
. If we reconsider the concept of profit margin as the ratio of profit versus selling price , we are looking at the minimum profit of 25% out of the selling price.


